I-Planet Web Server 6.x
Step by step instructions
1. Select the Install Certificate link on the left side of the page.
-
Once your request has been approved by Digi-Sign Authority and a Digi-SSL™ certificate has been issued, you must install it in the iPlanet Web Server.
2. Select the Security Tab.
3. On the left frame, choose the Install Certificate link.

-
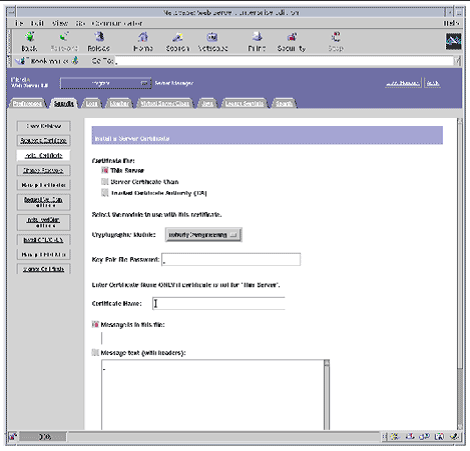
The screenshot depicts the following options:
Certificate For - This Server, Server Certificate Chain, or Trusted Certificate Authority (CA); a drop-down menu to select the module to use with this certificate ("nobody@engineering" is displayed as the default); a field for the Key Pair File Password; a field to enter the Certificate Name (Note: enter certificate name ONLY if this certificate is not for 'This Server'); a field to enter the message file or a field to enter the message text with headers.
Select Trusted Certificate Authority CA, enter the password and copy the text from the
UTN-USERFirst-Hardware to the Message Text box (including the BEGIN and END lines), then click 'OK'.
Accept the certificate.
NOTE:: Do not shutdown or restart the server until all steps have been completed.
Repeat the steps from above using the text from the Digi-Sign CA Digi-SSL Xs™ or
Digi-Sign CA Digi-SSL Xp™and choosing the 'Certificate Chain' option.
4. Fill out the form to install your certificate:
5. Choose Message text (with headers) and paste the text you copied from your certificate file: your_domain.cer
6. Click the OK button at the bottom of the page.
-
You are shown some basic information about the certificate.
7. If everything looks correct, click the Add Server Certificate button.
-
On-screen messages tell you to restart the server. This is not necessary, as the web server instance has been shut down the entire time. You are also notified that in order for the web server to use SSL the web server must be configured to do so. Use the following procedure to configure the web server.
Configuring SSL on iPlanet Web Server 6.X
1. Click the Preferences tab near the top of the page.
2. Select the Edit Listen Sockets link on the left frame.
-
The main frame lists all the listen sockets set for the web server instance.
a. Alter the following fields:
b. Click the OK button to apply these changes.
In the security field of the Edit Listen Sockets page, there should now be an Attributes link.
3. Click the Attributes link.
4. Enter the user@realm-name password to authenticate to the user@realm-name on the system.
5. Select SSL settings from the pop-up window.
-
You can choose Cipher Default settings, SSL2, or SSL3/TLS. The default choice does not show the default settings. The other two choices require you to select the algorithms you want to enable.
6. Select the certificate for the user@realm-name followed by: Server-Cert (or the name you chose if it is different).
-
Only keys that the appropriate user@realm-name owns appear in the Certificate Name field.
7. When you have chosen a certificate and confirmed all the security settings, click the OK button.
8. Click the Apply link in the far upper right corner to apply these changes before you start your server.
9. Click the Load Configuration Files link to apply the changes.
-
You are redirected to a page that allows you to start your web server instance.
If you click the Apply Changes button when the server is off, a pop-up window prompts you for a password. This window is not resizable, and you might have problem submitting the change.
There are two workarounds for the problem noted above:
10. Provide the requested passwords in the dialog boxes to start the server.
-
You are prompted for one or more passwords. At the Module Internal prompt, provide the password for the web server trust database.
11. At the Module user@realm-name prompt, enter the password you set when you created user in the realm-name using secadm.
12. Verify the new SSL-enabled web server at the following URL:
-
https://hostname.domain: server_port/
Note that the default server_port is 443.
